Guidelines for adding equipment within a Turnaround in DWC
Prior to defining activities against the Equipment for the Wall Chart,
the Equipment must first be added as Scope within the Turnaround.
Login to Digital
Wall Chart
Use your SAP credentials to log in to the Digital Wall Chart application.
Access the Home Page
Once logged in, you will be directed to the Home Page. Based on your privileges, you will see various tiles.
Start by navigating to Administrator Tile -> Turnaround
-> Select the Turnaround you want to add Equipment Scope too. From
there, navigate the below steps to add Equipment to scope of the
Turnaround.
Navigate to the Administrator Section
Click on the Administrator tile to access sections for Turnaround/Equipment/Owner/User.
Click on the Turnaround tab.
Choose a Turnaround
You will see a list of available turnarounds. Click on the turnaround that they are part of or added as a user.
View Equipment List for the Selected
Turnaround
After selecting the turnaround,
you will be shown a list of equipment linked to that turnaround.
Access the Equipment in Scope
Click the “+” button to navigate to the Equipment Selection page.
Once you click on the "+" icon, you will be presented with a list of equipment that has been configured by the respective turnaround Owner/User.
Select the equipment you want to add to the scope.
After selecting the equipment, click “Save”. A pop-up will appear to confirm saving your selection.
Upon saving, the selected equipment will appear in the list.
If we need to add the bulk equipment, then below steps needs to be followed
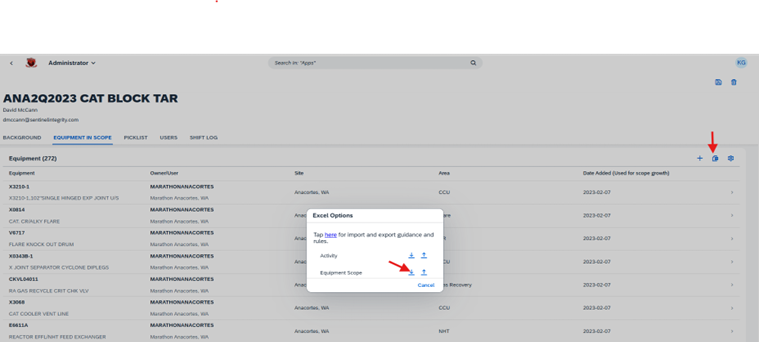
Click on EQUIPMENT IN SCOPE. On the right side of the page, you will see a highlighted icon (Excel Option) near an arrow.
Note: For adding the equipment, we must always download the latest/fresh sheet. This will ensure you are working with the most up-to-date data and avoid the risk of overriding any existing data and such as outdated formulas, missing columns, and other errors.
Equipment Sheet Details
Note: For adding the equipment, we must always download the latest/fresh sheet. This will ensure you are working with the most up-to-date data and avoid the risk of overriding any existing data and such as outdated formulas, missing columns, and other errors.
Equipment Sheet Details
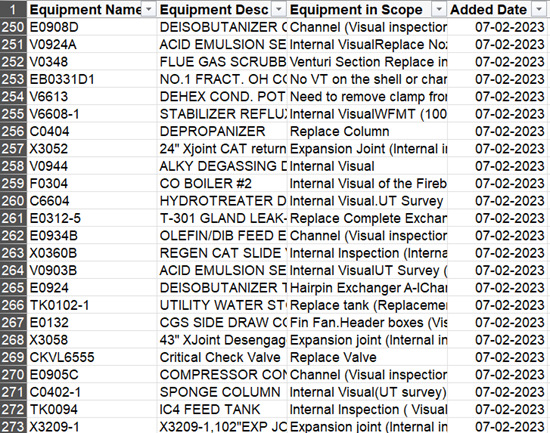
Once you download the equipment sheet, it will appear with four key columns.
The sheet will list all equipment associated with the selected turnaround. For example, you may see 272 pieces of equipment in the sheet.
Adding Equipment to the Turnaround
Adding Equipment to the Turnaround
To add an equipment item, input the Equipment ID and relevant details.
Note: Only equipment that has already been configured in the Equipment section can be added.

Upload the Updated Equipment Sheet
After making necessary changes, upload the updated equipment sheet.
Upload the Updated Equipment Sheet
After making necessary changes, upload the updated equipment sheet.
Confirmation of Successful Upload.
Once the sheet is successfully uploaded, you will see a Success Message Box confirming the upload.
Important: Guidelines for adding equipment and activities to a turnaround in the DWC Application.
When using a spread sheet to add bulk equipment, please be cautious to avoid overriding existing data. Follow these steps to ensure the accuracy and integrity of the data:
Always use the latest equipment sheet when adding equipment to a turnaround: Using an old spreadsheet for data updating can lead to issues such as outdated formulas, missing columns, and other errors. To avoid these problems, always start by downloading the latest sheet and before the turnaround for accurate data entry. This will ensure you are working with the most up-to-date data and avoid the risk of overriding any existing information.
Add New Equipment at the End in the sheet: When adding list of new equipment, always insert the new entries in the rows at the end of the sheet. Do not modify or delete any existing rows unless necessary, as this may cause existing data to be overwritten.
Double check while updating Fields: Ensure that the Equipment Description and Area columns are not left blank or null when performing uploads via MS Excel or adding data through the User Interface. All required fields must be filled in properly to prevent errors during the upload or data entry process. Also ensure the Equipment has an Area defined. Even if you do not have an area, set the value to “unknown”, “undefined”, or “N/A”, or something you are comfortable with.
Double check while updating Fields: Ensure that the Equipment Description and Area columns are not left blank or null when performing uploads via MS Excel or adding data through the User Interface. All required fields must be filled in properly to prevent errors during the upload or data entry process. Also ensure the Equipment has an Area defined. Even if you do not have an area, set the value to “unknown”, “undefined”, or “N/A”, or something you are comfortable with.
Related Articles
Managing Activities (Additions and Updates) in Digital Wall Chart (DWC) During a Turnaround
This article outlines step-by-step instructions to add or update activities within the Digital Wall Chart (DWC) during a Turnaround event. To Add an Activity in DWC 1. Login to Digital Wall Chart URL - ...Equipment Area Null or Empty causing issues adding to Wall Chart
The Equipment Area is not a required field when defining a piece of Equipment either via the Administrator -> Equipment App, or via the Bulk Import utility. However, when adding an Equipment to the Turnaround there is logic checking the Area to see ...The Ultimate Guide to Error-Free Data Imports in Digital Wall Chart (DWC)
In the fast-paced environment of plant operations, the Digital Wall Chart (DWC) plays a critical role in managing task assignments and turnaround schedules. However, data import errors can disrupt workflows, delay closures, and create confusion among ...Equipment Category Completeness graph shows any activities added after the Turnaround Start Date as “Remaining”
The Equipment Category Completeness graph shows any activities added after the Turnaround Start Date as “Remaining”. This is a code bug. Workaround: There is no workaround for this issue. It will be corrected in the next release.Assign and Attach Documents to Equipment and Functional Locations
How to Assign and A ach Documents You can assign and a ach documents to equipment and functional locations. In this sec on, we will learn how to assign and a ach documents to an equipment. To Add a Document 1. Login to the tenant and navigate to the ...